Workpiece Bracket Mount With Thumb Screw Gear Movement Adjustment
Front Derailleur Adjustment
This article will discuss the bones adjustment of the front derailleur. This article assumes the derailleur is compatible with the shifting organisation and is not extremely worn out.
1
Service Procedures
What Tools exercise I need?
- Repair Stand — holds bike secure for piece of cake work
- Hex wrenches equally needed
- Screwdriver (#2 Phillips or directly bract)
- Light lubricant
- Derailleur cable inner wire and housing as needed
- Caliper or metric ruler
- Cable finish caps and housing finish caps as needed
- Rags
The front end derailleur but shoves the chain off one front chain band and onto another ring. The cage surrounding the chain is pulled in one direction by the inner wire. A jump in the derailleur returns the muzzle to the other direction when the inner wire is relaxed. A properly adjusted front derailleur should shift the chain between the forepart chainrings merely volition not throw the concatenation off the rings. The basic adjustments for the front derailleur are the superlative, rotation, limit screws and inner wire tension (index setting).
It is by and large a skilful thought to lubricate the pivot point of the front derailleur with a light lubricant. The cable inner wires should also be lubricated. If you have loosen the inner wire pinch bolt, lubricate those threads equally well. When tightening this pinch bolt, secure to approximately xxx-40 inch-pounds. This is about 10 pounds of endeavor hold a wrench 3 inches from the bolt.
2
Front Derailleur Top
Before checking limit screw adjustments, cheque the derailleur positioning. If the derailleur cage is also far above the large chainring, information technology is more likely to shift poorly. If the derailleur is too low, it may scrape against the chainrings or jam the chain when shifting.
Some front derailleur models do not have elevation or rotation adjustments. These models mountain on a plate and both height and rotation settings are preset. Additionally, some bikes take a subclass ordinarily referred to every bit a "braze-on" for front derailleur mounting. This subclass volition permit express tiptop and rotational settings.
- Inspect peak alignment of forepart derailleur. The outer cage plate must be positioned over the largest chainring when viewing top. Only grab the exposed front end derailleur inner wire until outer cage plate is straight over outer chainring teeth. Use intendance to not shift the derailleur cage past this betoken. Note height and direction of change needed. It is then necessary to relax the cable to loosen the mounting bolt and raise or lower the peak as needed.
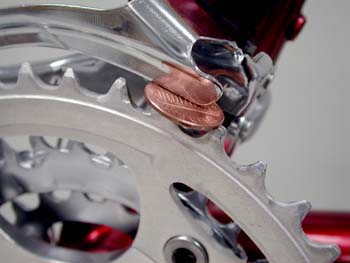
- The gap betwixt the teeth of the outer chainring and lower edge of the outer muzzle plate should exist ane-2mm, about the thickness of a penny. Using a penny or a dime as a feeler judge, fit it between the chainring teeth and the cage plate. It should but fit betwixt the teeth and plate.
- To lower muzzle, release inner wire tension completely by shifting to innermost chainring. Note angle of outer muzzle plate relative to chainring.
- Forepart derailleur clamps typically leave a marking on the frame, which is useful as a reference when changing height. Loosen derailleur clamp bolt, modify derailleur tiptop, and return muzzle to aforementioned rotation relative to chainring. Tighten clamp commodities. Move outer cage plate over outer chainring, and bank check peak again. Repeat this process until cage plate height is 1-2mm above outer chainring.
3
Front Derailleur Rotational Angle
The front derailleur cage should exist approximately parallel to the chain. If the derailleur muzzle is rotated too far from this position, it will shift poorly. If the derailleur mountain is a clamp type, its rotation can be changed. Generally, the outer cage of the forepart derailleur should be aligned to the chain. Image C below shows adequate alignment.

- Shift chain to outermost chainring and outermost rear sprocket.
- Sight concatenation from directly to a higher place chainrings. Consider the concatenation as representing a straight line. Compare this line to outer derailleur muzzle plate. Outer cage plate and concatenation should be parallel. Keeping the cage and chain parallel will minimize the risk of the chain jumping off the outermost ring. If cage is not parallel, there will be a relatively big gap at either the back or the front end of the muzzle, and the chain may over shift.
- If derailleur cage needs to be rotated, notation direction of desired rotation.
- Release inner wire tension past shifting to the innermost chainring.
- Many clamps exit a slight marking on the frame. Use this scarring every bit a reference when irresolute height. It is as well possible to use a pencil to make two reference marks on the frame, i for height and a second, vertical mark, to reference rotation. Apply the marks to avoid inadvertently irresolute height.
- Loosen clamp bolt and slightly rotate in correct direction. Use care non to alter height. Tighten derailleur clench bolt.
- Shift to outer chainring and observe rotation alignment. Repeat adjustment if necessary.
Note: Some front derailleur models do not have acme or rotation adjustments. These models mount on a plate and both superlative and rotation settings are preset. Additionally, some bikes have a bracket usually referred to equally a "affix-on" for front derailleur mounting. This bracket will allow limited acme and rotational settings.
4
Limit Screw Settings
Limit screws stop the inward and outward travel of the front derailleur cage. Limit screws are marked "Fifty" and "H." The L-spiral will terminate the motion of the derailleur toward the smallest chainring. The H-screw will terminate the move of the derailleur toward the largest chainring.
If the limit screws lack whatever marker, you will need to determine which are the "H" and "L" by testing. Begin with the concatenation on the smallest cog. Relax the cable tension completely using the cable barrel adjuster. Identify a paw on the derailleur body to feel for any lateral motion, and select 1 screw to turn one full turn clockwise then counter-clockwise. If you felt movement in the derailleur, this is the "L" screw. If in that location was no movement, practice the aforementioned test with the other limit screw. Yous should consider marking the "50" screw permanently. The other spiral by default is the "H" screw.
Although the limit screws volition stop the derailleur, it is the inner wire and derailleur spring that make the derailleur move. If the inner wire has too much tension, the derailleur will non residue on the L-screw stop. If the inner wire tension were to change, the derailleur inner limit would too change, possibly causing the concatenation to autumn off the rings.
5
L-Spiral Adjustment
The L-screw controls the inward most travel of the front derailleur. Fix adequately, it allows the chain to shift to the smallest ring, but not beyond and then it falls off.
- Shift chain to innermost rear sprocket and innermost front chainring. Audit derailleur for marking indicating "L" screw.
- Check inner wire tension. Information technology should be fairly loose at this time. If inner wire is taut, turn barrel adjuster clockwise into housing. The butt adjuster is typically located where the cablevision housing enters the shift lever. If butt adjuster is already fully turned into housing, loosen inner wire pinch bolt, slacken inner wire and retighten bolt.
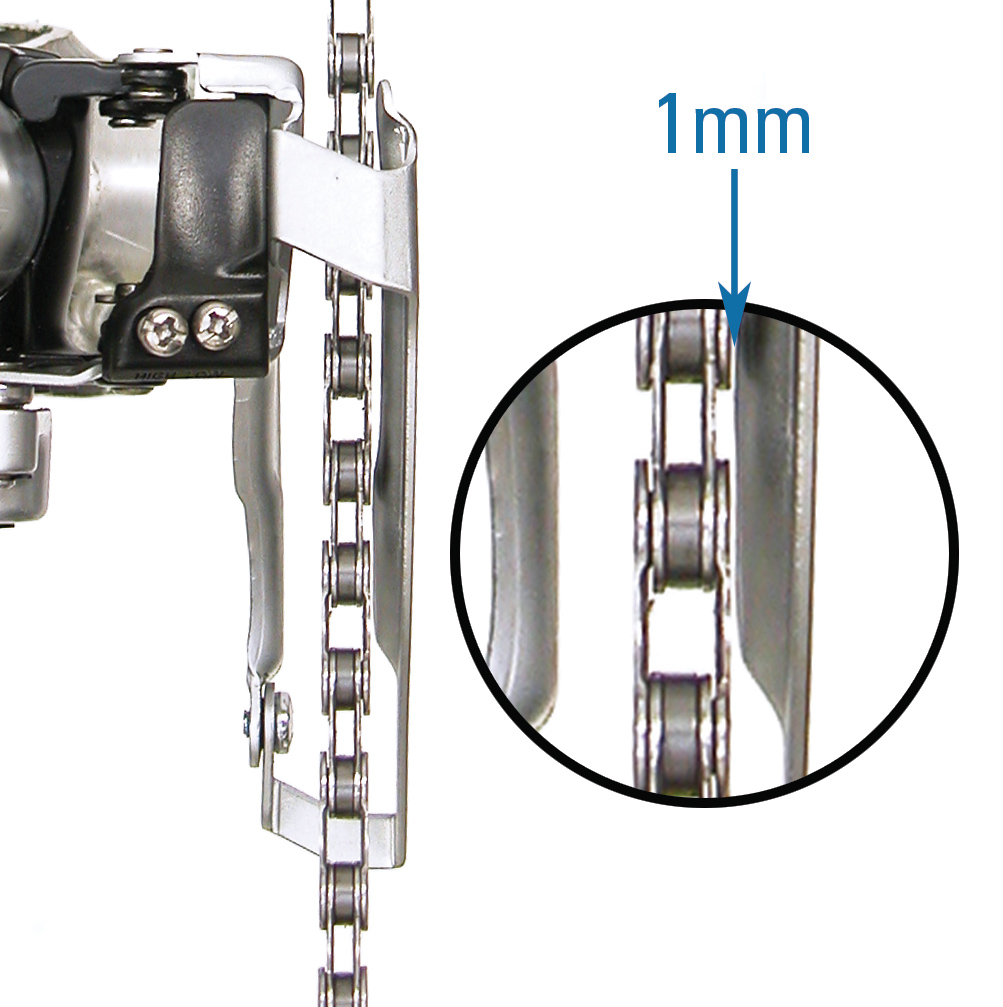
- Sight gap between inner chain plate and inner muzzle plate. Just a small gap should exist visible, most one/16″ or 1mm, near the thickness of a dime.
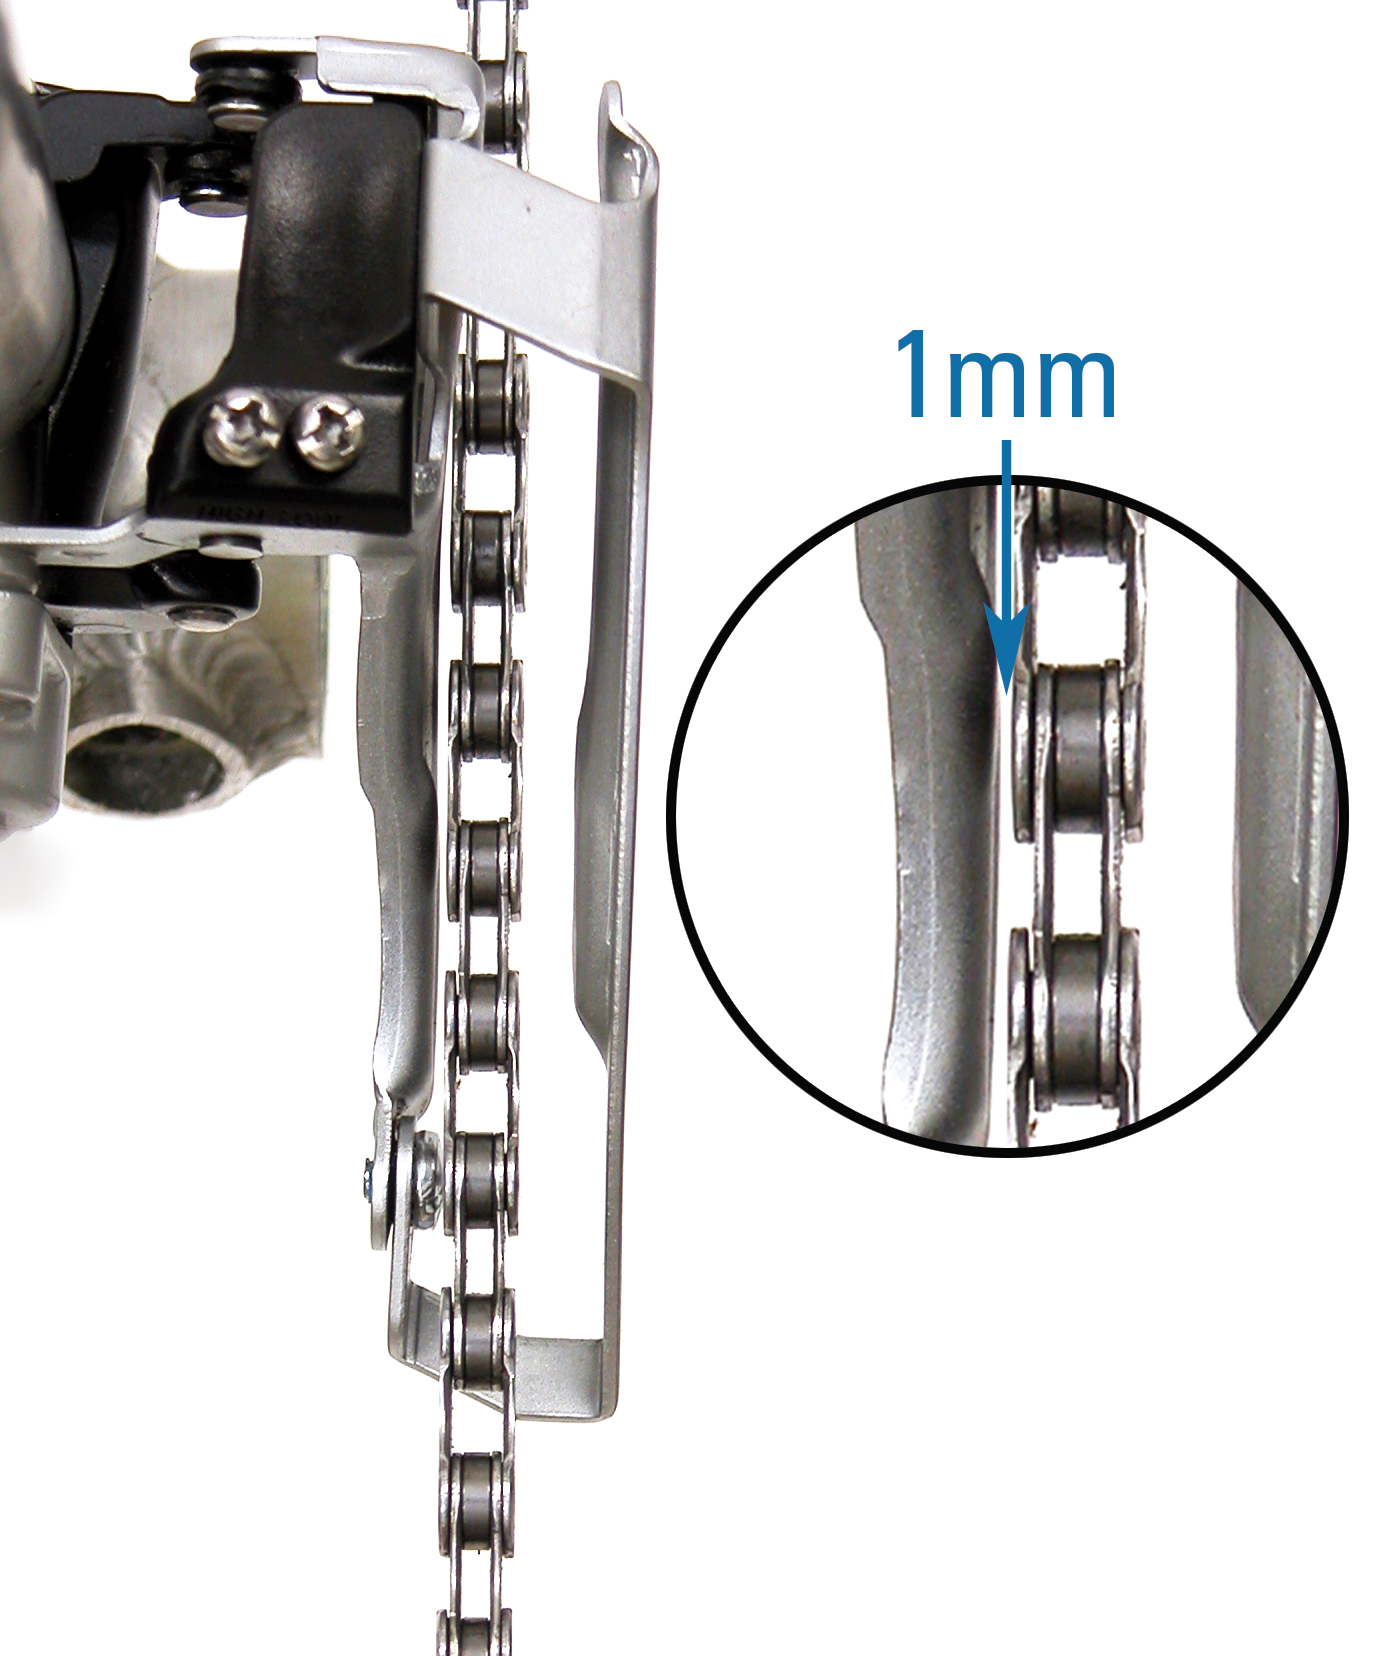
- Pedal bike slowly and keep to sight gap. Set clearance at tightest bespeak in chainring rotation. Adjust L-screw then there is a pocket-size gap between inner muzzle and inner chain plate. Pedal cycle and bank check that chain is not rubbing muzzle as chainrings turn.
- If there is no gap and chain is rubbing muzzle, loosen 50-limit screw 1/8 turn (counter-clockwise). Audit for gap again and repeat until slight gap appears.
- If the gap appears larger than 1mm at its widest point, tighten the L-screw, in small increments, until the gap closes.
- Test the shift by shifting concatenation to next chainring then shift back to the innermost band. Practice not use the shift lever. Pull on the inner wire to shift the derailleur. Using the lever may confuse limit screw issues with cablevision tension issues. If chain shifts quickly, limit screw setting is adequate.
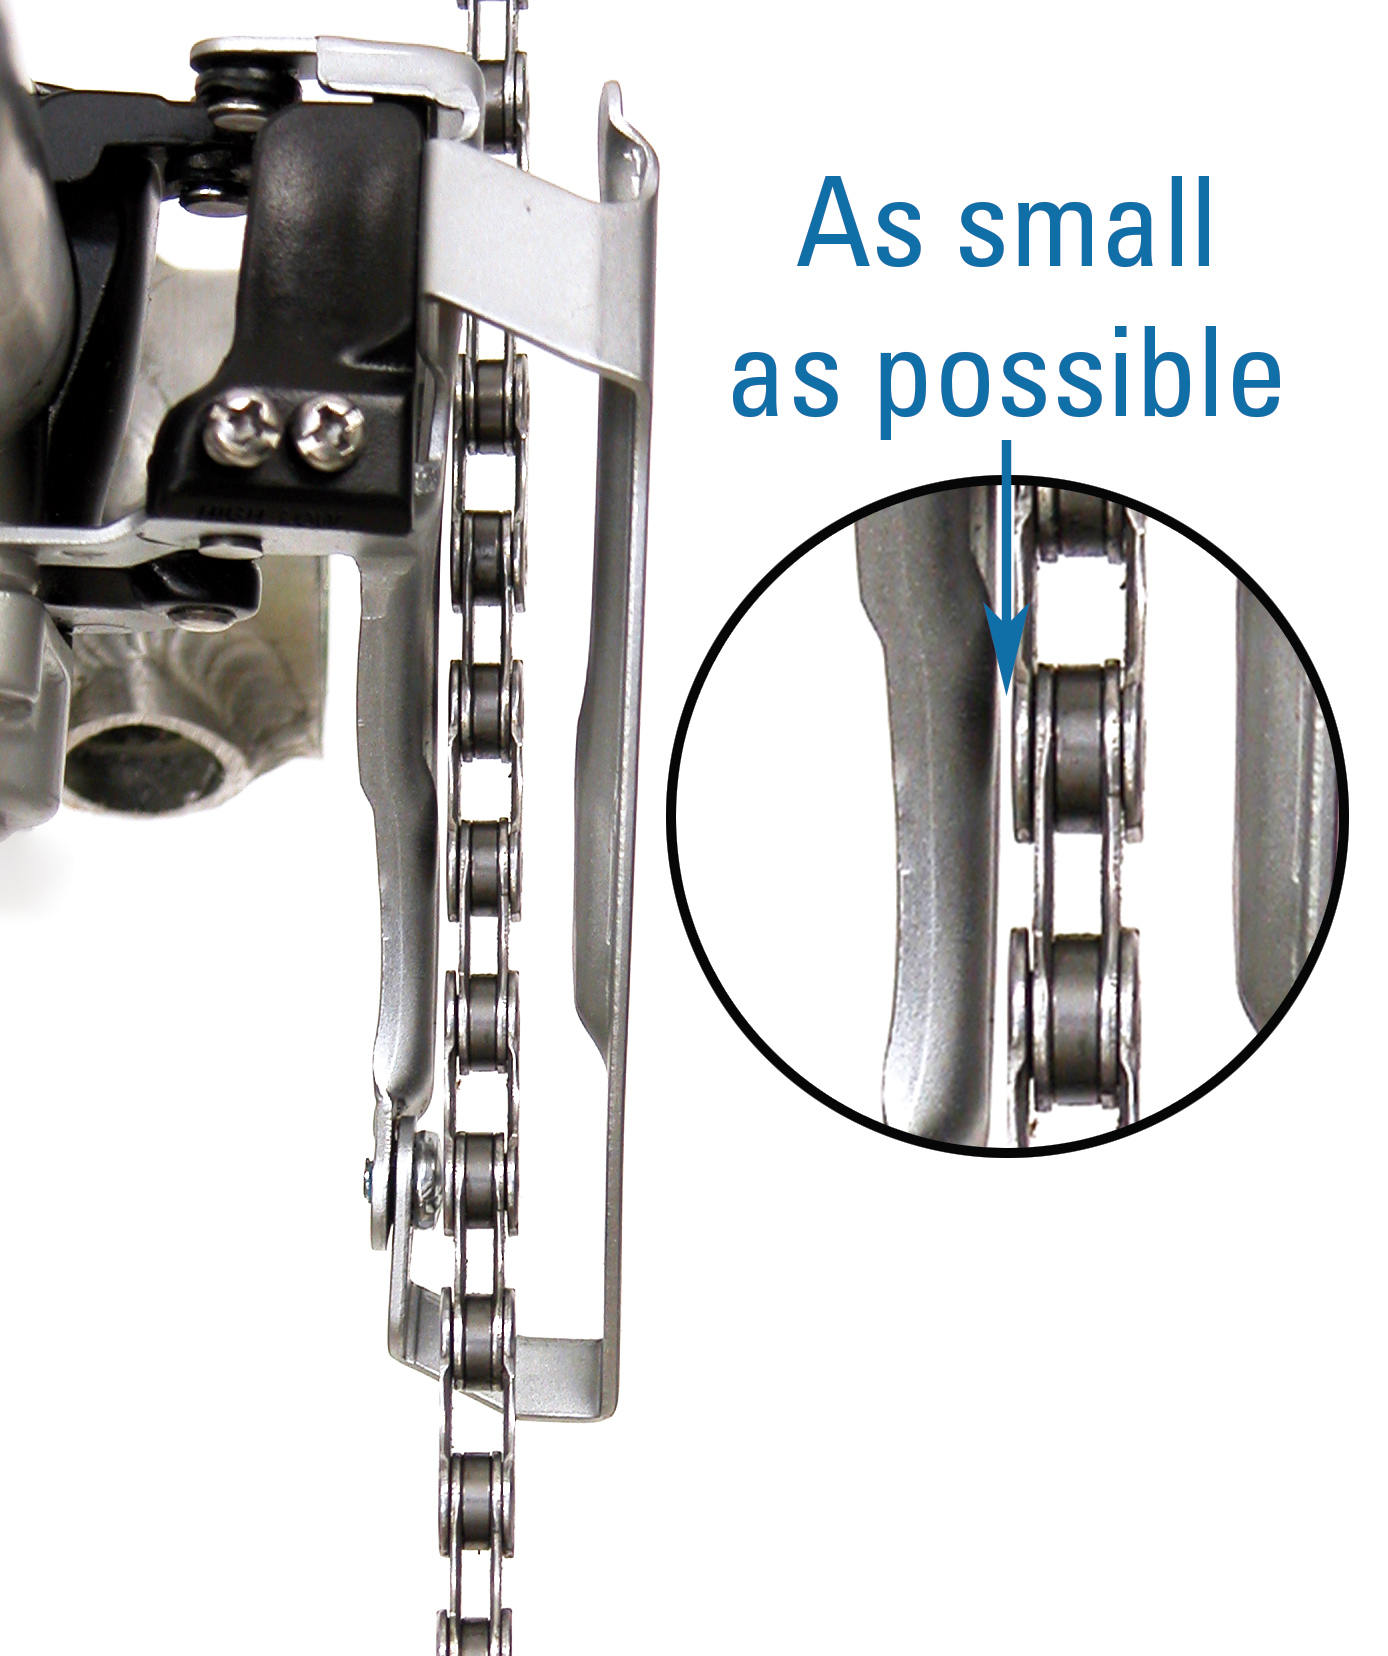
- If the shifting appears is irksome (requires more than one pedal revolution to initiate shift), plow L-limit counter-clockwise 1/8 turn and echo test. Repeat 1/8-plow increments until shifting is adequate. The gap will open wider than the 1mm target, but will still exist every bit small every bit possible with acceptable shifting.
- If chain is shifting across the inner ring and falls off the chainring, gap may be besides big or cage alignment may exist off. Tighten L-screw i/viii turn and check shift again. If chain ends up rubbing inner muzzle of derailleur, yet nevertheless drops off inner ring when shifting, other problems such every bit chain line or derailleur rotation exist.
half dozen
H-Spiral Adjustment
The outward travel of the front derailleur is stopped by the H-spiral. When viewing the H-limit aligning, make sure at that place is plenty tension on the inner wire by either keeping actress pressure on the lever, or by pulling the exposed inner wire taut by manus. Utilize a rag to protect your hand if pulling the inner wire. Later the H-screw is adapted the inner wire should be re-tensioned to assure proper shifting.
- Shift to outermost sprocket in rear and outermost front end chainring. Inspect derailleur for mark indicating H-spiral.
- Pull inner wire with paw to increase tension to insure derailleur is confronting H-screw.
- Maintain full force per unit area on inner wire and bank check gap between chain and outer cage plate. Only a small gap should be visible, well-nigh i/16″ or 1mm. Pedal bike slowly and continue to sight gap. Set up clearance at tightest point in chainring rotation.
- If chain is rubbing cage, loosen H-spiral 1/8 turn and pull fully on inner wire. Cheque gap over again.
- If chain is not rubbing, tighten H-screw repeatedly until chain is 1mm
- Test shift to the large band. Shift derailleur from side by side to largest to largest ring using paw pressure on inner wire rather than shift lever. If shifting is slow, loosen H-limit spiral slightly and repeat exam. If concatenation shifts off the outside of the big chainring, the outer-limit is set up too loose. Tighten H-screw limit and test shift again.
7
Index Adjustment—Three Chainring Bikes
Some front end derailleur systems have an index setting. If the shift lever has iii distinctive stops or clicks, it is an index shifter. If the front shift lever is friction, there is no index setting. If the front shift lever has multiple clicks, such as some twist grip style shifters, information technology is shifted like to friction levers. Ready indexing merely after completing all aligning above.
- Shift chain to eye chainring in the front and innermost rear sprocket.
- View gap between inner cage plate and chain. Gap should be as small-scale as possible without rubbing concatenation.
- To reduce gap, increase inner wire tension by turning barrel adjuster counter-clockwise. Adjusting barrel may exist on frame or on shift lever. Check gap over again.
- If chain is rubbing cage, plough barrel adjuster clockwise, or inward toward shifter body.
- If barrel adjuster is all the manner in or out at that place will be no aligning possible. In these cases reset the barrel. Shift to innermost chainring and loosen inner wire pinch bolt. Plow the barrel fully clockwise and back out near 2 full turns. Pull wire gently with fourth-hand tool and tighten compression bolt. Brainstorm adjustment of inner wire tension as above.
- Examination shift of front derailleur to all three front chain rings. If the derailleur rubs in the largest front chainring, double check H-limit screw and inner wire tension, which may exist too loose. If chain is slow to shift to smallest chainring, double check L-limit screw and inner wire tension, which may be too tight.
8
Alphabetize Adjustment—Ii Chainring Bikes
Some front derailleur systems have an index setting. If the shift lever has ii distinctive stops or clicks, information technology is indexing. If the front shift lever is friction, there is no index setting. Annotation: Some bike uses an "in-line" barrel adjuster to change housing length and ready the indexing.
- Shift chain to outer chain ring in the front end and outermost rear cog.
- View gap between outer cage plate and concatenation.
- If outer cage plate clears chain, index setting is acceptable.
- If plate is rubbing chain, increment inner wire tension by turning adjusting butt counter-clockwise and check again.
- If barrel adjuster is all the manner in or out at that place volition be no aligning possible. In these cases reset the butt. Shift to innermost chainring and loosen inner wire pinch bolt. Plough the butt fully clockwise and dorsum out virtually ii total turns. Pull wire gently with fourth-hand tool and tighten compression commodities. Brainstorm adjustment of inner wire tension every bit higher up.
- Examination shift of forepart derailleur to both front end chainrings.
ix
Front Derailleur Performance
The forepart derailleur should shift the chain betwixt chainrings without throwing the concatenation off the extreme outer and inner rings. It is possible that the front derailleur will rub the chain slightly even on properly adjusted bikes. This is probable on some bikes when riding in the largest sprocket in front end and the smallest cog in back. As the bicycle is pedaled with force the frame flexes and moves the chainrings side to side, which cause an intermittent rubbing racket. Loosening the H-limit would move the front cage out more, and may stop the rubbing, but it may also cause the chain to shift over the largest ring and come off. If all aspects of forepart derailleur adjustments are correct on this cycle, the passenger is simply exceeding the engineering science and design capabilities of the machine.
DOWNLOAD HERE
Workpiece Bracket Mount With Thumb Screw Gear Movement Adjustment UPDATED
Posted by: samprelf1944.blogspot.com


Comments
Post a Comment